
Instead of repeatedly replacing damp insulation, follow a crawl space insulation vapor barrier workflow that fixes water entry, chooses the right insulation boundary, and seals exposed soil before installing insulation. This 2026 guide explains the sequence, the checks between stages, and when you need professional help rather than another layer of material.
- Crawl space insulation vapor barrier work starts with drainage repairs, not insulation installation.
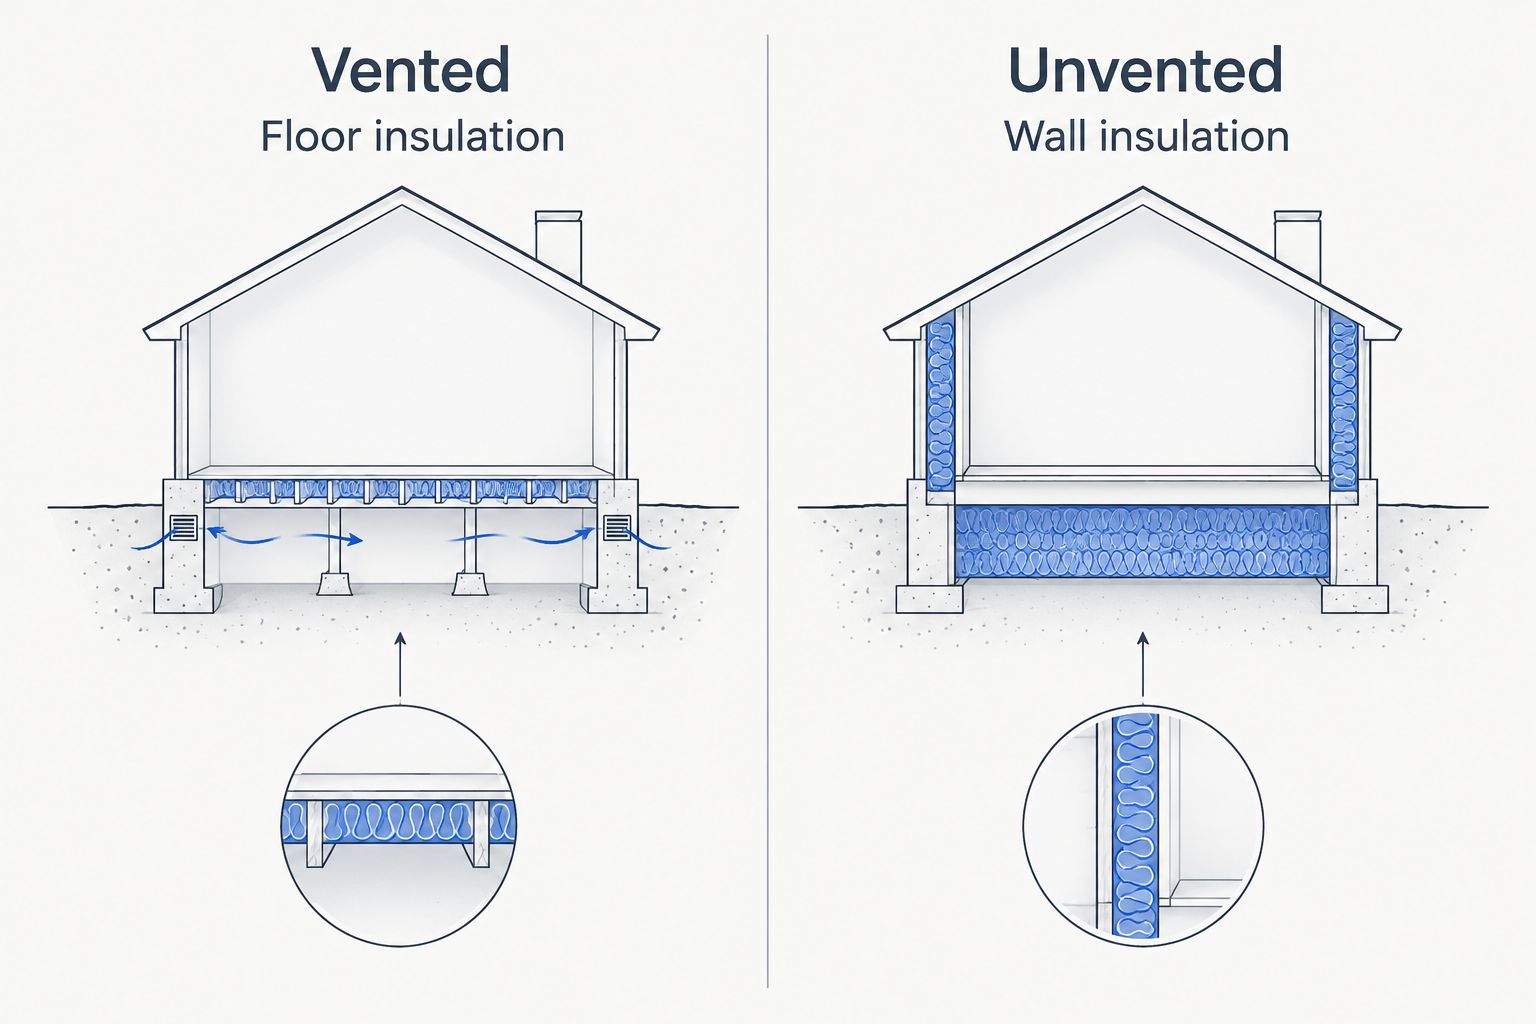
- Vented crawl spaces usually insulate the floor above; approved unvented designs generally insulate foundation walls.
- A ground vapor barrier limits soil moisture; it does not stop flooding or replace air sealing.
- JC Home Care Center, Inc. serves Long Island and NYC homeowners seeking residential insulation installation.
Why this matters
Insulation slows heat transfer. A ground vapor barrier limits water vapor moving from exposed soil into the crawl space. Neither material repairs a plumbing leak, redirects roof runoff, or dries damaged framing by itself.
Fix water problems before covering surfaces. Otherwise, you hide the evidence while leaving the moisture source active. Wet insulation, musty odors, and cold floors need a diagnosis before they need replacement material.
For local context, start with this guide to crawl space insulation for Long Island homes. Your project still needs a site-specific decision about ventilation, drainage, equipment, and the location of the home's thermal boundary.
JC Home Care Center, Inc. is a fit for Long Island and NYC homeowners seeking residential insulation installation. For a crawl space project, confirm the proposed scope, including which moisture-control tasks require a separate specialist.
Before you start
- Access and safety: Arrange safe lighting, clear entry, and permission to inspect the space. Stop for standing water near electrical equipment, sewage, damaged wiring, suspected hazardous materials, or unstable framing. Those conditions require qualified help before insulation work.
- Assessment and materials: Have the crawl space layout, drainage findings, insulation specifications, and a written vapor-barrier detail ready. Select compatible membrane, seam tape, sealant, and attachment methods from the manufacturers' instructions—not from appearance alone.
- The hidden gotcha: Closing vents changes the crawl space design. Before doing it, have a qualified professional check combustion-air needs, local code, termite inspection access, and the required moisture-control method. A fuel-burning appliance can make an otherwise simple enclosure project unsafe.
You can document conditions and monitor humidity yourself. Electrical changes, combustion-safety checks, structural repairs, substantial mold cleanup, and changes to the enclosure design belong with the appropriate professionals.
Water control and insulation boundary
Establish the crawl space design
- Document conditions. Photograph exposed soil, foundation walls, joists, plumbing, ducts, vents, and the access opening. Mark stains, deteriorated wood, fallen insulation, and water tracks. Record whether moisture appears after rain or while plumbing fixtures operate.
- Correct water entry. Repair plumbing leaks and have exterior drainage problems addressed. Gutters, downspouts, grading, foundation drainage, and groundwater management need separate attention where they contribute to wet conditions.
- Assess damaged materials. Have wet or deteriorated insulation and affected framing evaluated before covering them. Do not assume that wood is dry because its surface looks dry; concealed areas need inspection too.
- Choose the boundary. Decide whether the crawl space remains vented, with insulation at the floor above, or becomes an approved unvented space, with insulation generally at the foundation walls. Put that decision in the written scope.
Expected result: You have a documented water-control plan and a clear insulation location. Do not advance while active leakage, unsafe conditions, or the enclosure design remain unresolved.
For your 2026 project, compare the two designs by how the whole space will operate—not by insulation material alone.
| Crawl space design | Best for | Main advantage | Main limitation |
|---|---|---|---|
| Vented, floor-insulated crawl space | Homes retaining an approved vented arrangement | Separates the living area thermally from the crawl space | Pipes and ducts below the floor remain outside the home's thermal boundary |
| Approved unvented, wall-insulated crawl space | Homes where an enclosed design suits the structure and equipment | Brings the crawl space inside the insulated enclosure | Requires coordinated ground sealing, air sealing, and code-compliant moisture control |
Neither design is a universal winner. Choose the approved assembly first; select insulation to match it. Blocking vents without completing the rest of an unvented design is not a substitute for that decision.
Ground vapor barrier assembly
Prepare and seal the ground cover
- Prepare the surface. Remove sharp debris and address pest activity before laying the membrane. Protect it from rough surfaces using the specified preparation method. Keep drains, equipment, and inspection areas accessible.
- Select the membrane. Use a ground vapor retarder specified for the assembly and expected access conditions. Vapor resistance and puncture resistance are different properties; a material can resist vapor yet still tear during maintenance.
- Lay out the sheets. Cover exposed earth and arrange seams where you can seal and inspect them. Allow for posts, piers, pipes, perimeter connections, and service routes. Do not stretch the membrane tightly across uneven ground.
- Seal the details. Join sheets using the specified overlap and compatible sealing products. Seal around penetrations and connect the membrane to walls or piers as the approved assembly requires. Follow local requirements for inspection gaps and attachment locations.
- Inspect before concealment. Check corners, seams, penetrations, and attachments. Repair tears using the membrane manufacturer's method, then photograph the completed ground cover before later work obscures it.
Expected result: Exposed soil is covered, seams are sealed, and required perimeter connections are secure. There are no visible holes, loose transitions, or blocked service points.
For a 2026 planning reference, the model International Residential Code's unvented crawl space provisions call for a Class I ground vapor retarder, sealed overlaps of at least 6 inches, and edges extending at least 6 inches up the stem wall, attached and sealed. These are model-code details, not confirmation of the rules adopted for your address.
A Class I vapor retarder has a permeance of 0.1 perm or less. That rating describes vapor transmission—not resistance to flooding, foot traffic, or punctures. Confirm the applicable requirements with your local building department and the assembly designer.
A sealed ground cover is not automatically a complete encapsulation system. An unvented design also needs the specified wall connections, enclosure details, and moisture-control provisions.
Air sealing and insulation assembly
Complete the selected thermal boundary
- Seal the relevant air leaks. For a vented design, address leaks through the floor assembly into the living space. For an unvented design, address exterior leakage at the perimeter, access opening, and other enclosure transitions. Use materials appropriate to each opening and required fire-safety detail.
- Install insulation in the approved location. In a floor-insulated design, fit insulation against the underside of the subfloor without gaps or compression, using the specified supports. In a wall-insulated design, install the specified foundation-wall assembly with continuous coverage and detailed joints.
- Finish vulnerable transitions. Include the rim joist, access hatch, and interruptions around framing or utilities in the plan. Do not cover required termite inspection areas or bury components that need servicing.
- Verify protection requirements. Confirm required clearances, approved uses, and fire-protection details for the selected material. Foam products need particular attention to applicable ignition- or thermal-barrier requirements.
Expected result: Insulation follows one deliberate boundary, stays securely in place, and connects to the air-sealing details. Required inspection and equipment access remain available.
Do not add an extra plastic layer beneath floor insulation simply because the soil now has a membrane. A ground vapor barrier and a floor-assembly vapor retarder serve different locations and purposes. Extra low-permeance layers can restrict drying; their placement needs an assembly-specific decision.
JC Home Care Center, Inc. provides residential insulation installation, including attic and wall work. Ask for an insulation scope that distinguishes material installation from drainage repair, ground sealing, and any mechanical changes rather than treating all of them as one interchangeable task.
Moisture control and verification
Check the completed system
- Provide the required moisture control. For an unvented crawl space, have the specified code-compliant method installed and checked. If the design includes a dehumidifier, provide an approved drainage arrangement and maintenance access. A ground membrane alone does not control every moisture source.
- Measure humidity. Place a suitable humidity monitor where it represents crawl space air, away from direct discharge or a localized wet spot. Record readings alongside weather and visible conditions so you can investigate patterns.
- Inspect after rain. Check for water above or below the membrane, loose seams, condensation, and new staining. Inspect plumbing and equipment connections without disturbing the insulation or ground cover.
- Keep the handover record. Save product information, photographs, inspection documents, and maintenance instructions. Record who handles future membrane repairs, equipment service, or drainage concerns.
Expected result: The completed assembly stays intact, equipment operates as specified, and moisture checks show no unresolved water entry or condensation.
The U.S. Environmental Protection Agency's household mold guidance recommends keeping relative humidity below 60%, ideally 30%–50%. Use that published guidance as a moisture-management reference in 2026—not as proof that concealed wood is dry or that the crawl space meets every design requirement.
A single acceptable reading does not finish the assessment. Recheck during humid weather and after rain, and investigate persistent increases rather than simply changing an equipment setting.
When the existing ground cover is still usable
You do not always need to remove an intact membrane. Best for: homes with an existing ground cover that can be inspected, repaired, and incorporated into the approved design. Reuse avoids unnecessary disturbance, but its limitation is uncertainty about concealed damage and incomplete perimeter details.
Before insulating, inspect the membrane's condition, seams, penetrations, and wall connections. Confirm that its documented properties meet the proposed assembly. Repair compatible defects or replace material that cannot provide a reliable continuous cover.
Repeat the moisture and drainage checks after plumbing repairs, pest work, or equipment replacement. A previously sound membrane can be damaged by later service visits.
If converting from vented to unvented operation, reassess the whole enclosure. Existing floor insulation, ventilation, mechanical equipment, and wall details all need review; closing the vents is only one part of the change.
Troubleshooting
- Water collects beneath the membrane: Investigate groundwater and drainage. Do not treat another membrane layer as the repair; the water-management system needs attention.
- Humidity stays high after ground sealing: Check remaining exposed soil, plumbing leaks, exterior air leakage, and the specified mechanical moisture-control method. Confirm drainage and equipment operation before increasing insulation.
- Floor insulation sags or separates: Check for wet material, incorrect fit, and inadequate supports. Correct the cause, then repair or replace the affected installation using its specified support method.
- Seams or wall attachments release: Check substrate preparation, incompatible adhesive, moisture, and tension in the membrane. Rework the connection with approved products and attachment details.
- The odor remains despite lower humidity: Inspect for concealed wet materials, contaminated debris, plumbing problems, or pest activity. Do not cover an unexplained odor source with new insulation.
Customize your workflow
In 2026, make the insulation estimate describe responsibilities as clearly as materials. Ask who repairs leaks, prepares the ground, seals penetrations, installs insulation, checks equipment, and documents completion. A scope that omits those interfaces leaves important work undecided.
JC Home Care Center, Inc. serves homeowners across Long Island and the five boroughs. When discussing residential insulation installation, explain whether your priority is cold floors, moisture, or a broader comfort problem, and request a scope that addresses the relevant assembly.
If the assessment also identifies drafts upstairs, use this guide to seal air leaks before adding insulation. Expand the work according to the diagnosis, not by adding material wherever access is easiest.
FAQ
Should the vapor barrier go in before crawl space insulation?
Complete water repairs and the ground vapor barrier before installing new insulation that would obstruct inspection. Air sealing and insulation then follow the approved vented or unvented assembly.
Is a crawl space vapor barrier the same as insulation?
No. A ground vapor barrier limits moisture vapor from soil, while insulation slows heat transfer; neither replaces drainage repairs or air sealing.
Should I insulate crawl space walls or the floor above?
The crawl space design determines the insulation location. Vented designs generally insulate the floor above, while approved unvented designs generally insulate foundation walls.
Can I close crawl space vents after laying plastic?
Do not close vents without an approved unvented design. Ground sealing, moisture control, combustion safety, and local code requirements need review together.
Will a vapor barrier stop water from entering my crawl space?
No. A ground vapor barrier controls soil vapor, not flooding or plumbing leaks; water entry requires its own drainage or repair solution.
Can I keep my existing crawl space insulation?
Keep existing insulation only when its condition, installation, and location suit the approved assembly. Wet, damaged, or poorly supported material needs assessment before it is retained.
What humidity should I aim for in my crawl space?
EPA household mold guidance recommends relative humidity below 60%, ideally 30%–50%. Use that as a reference alongside the crawl space design requirements, moisture inspections, and equipment instructions.
One last thing
Photograph the membrane before the insulation hides its connections. Finished insulation can look orderly while a missed seam or penetration remains out of sight. Your 2026 handover should show the ground cover, perimeter details, and insulation boundary—not just the final appearance.
Related guides
- How to insulate a crawl space against moisture
- How to compare insulation contractor estimates line by line
- Basement rim joist insulation for Long Island homes