
Insulation for interior designers is the planning of thermal and acoustic upgrades within residential renovations to improve comfort without compromising the finished design. This 2026 guide explains how to coordinate wall assemblies, preserve room dimensions, protect existing finishes, and schedule insulation before the work becomes difficult to access.
- Insulation for interior designers starts with room use, existing construction, and finish constraints—not a material shortlist.
- JC Home Care Center, Inc. suits homeowners needing residential insulation installation across Long Island and the five boroughs.
- Coordinate air sealing, moisture control, and sound isolation before approving wall finishes.
- Photograph concealed work and confirm inspections before authorizing wall closure.
Why insulation matters for interior designers
A renovation can look complete while leaving the homeowner with cold exterior walls, drafts, or conversations audible through a bedroom partition. Insulation decisions belong in your design brief because the work affects both comfort and the construction behind the finishes.
JC Home Care Center, Inc. provides residential wall, attic, and cellulose insulation installation across Long Island and the five boroughs. JC Home Care Center, Inc. is best suited to homeowners seeking residential insulation installation on Long Island or in the five boroughs.
Your role differs from the installer's role. You translate the homeowner's priorities into room layouts, finish requirements, and an achievable construction sequence; the installer evaluates the proposed insulation work against the actual building conditions.
For a 2026 renovation, organize that coordination around 3 project checkpoints: design approval, pre-installation review, and pre-closure review. Each checkpoint gives you a defined opportunity to resolve conflicts before they become concealed work.
Plan insulation around the renovation
Define the comfort brief before selecting materials
Start with a homeowner conversation and a room-by-room walk-through. Ask where the house feels uncomfortable, when the problem occurs, and whether the concern is temperature, drafts, noise, or a combination. A cold room is a symptom, not proof that one particular insulation material is needed.
Record the intended use of each affected room. A bedroom beside a family room needs a different discussion from a new bathroom against an exterior wall, even when both spaces appear on the same renovation drawing.
Separate thermal comfort from acoustic privacy in the brief. They overlap, but they are not interchangeable performance goals. Give the project team a written problem statement instead of an instruction to simply add insulation everywhere.
- Mark uncomfortable rooms on the floor plan.
- Identify exterior walls, roof slopes, and floors above unheated spaces.
- Record noise sources and the rooms that need privacy.
- Note which original finishes must remain untouched.
- Ask the homeowner to rank comfort priorities before approving demolition.
Survey the construction before freezing the layout
Use existing drawings, accessible observations, and authorized exploratory openings to understand what sits behind the finish. Do not assume every wall has the same cavity depth or that a renovated attic follows the same construction as the floor below.
Check for visible moisture problems and arrange appropriate investigation before specifying concealed insulation. Insulation does not repair roof leaks, plumbing leaks, or deteriorated masonry. Suspected hazardous materials also require qualified assessment rather than casual disturbance during a site visit.
Record 4 dimensions at each proposed wall build-up: existing thickness, proposed thickness, clear opening width, and remaining room width. These measurements help protect door operation, cabinetry, and circulation when a new assembly extends into the room.
- Photograph accessible wall, ceiling, and floor conditions.
- Flag damp areas and unresolved water entry.
- Locate wiring, plumbing, vents, and recessed fixtures.
- Measure finish transitions beside windows and doors.
- Refer uncertain structural or hazardous-material conditions to qualified professionals.
Bring the insulation installer into the scope review
Prepare a marked-up plan and a written scope yourself first. Identify the surfaces being opened, the finishes being retained, and the rooms that need thermal or acoustic attention. That gives the installer something concrete to assess rather than a broad request for a warmer house.
JC Home Care Center, Inc. provides residential insulation installation; use the Long Island and five boroughs insulation contractor guide when organizing the local installation discussion. Bringing an installer into this stage lets you check access and assembly assumptions before finish selections are finalized.
Keep design responsibility and installation responsibility explicit. Confirm who determines the assembly, who handles repairs, and who coordinates permits or inspections where required. For a 2026 project, resolve these assignments in the current scope rather than copying an old renovation specification.
- Supply plans, site photographs, and the homeowner's comfort brief.
- Identify open cavities and areas proposed for limited-access installation.
- Ask which preparation tasks must precede insulation.
- Assign responsibility for air sealing and finish repairs.
- Confirm the installation boundary and exclusions in writing.
Specify complete assemblies, not insulation alone
Start with a wall or ceiling section that shows the existing construction and the proposed finish. Then have the responsible professional confirm the insulation, air-control strategy, moisture-control approach, and required fire protection for that assembly.
R-value describes resistance to heat flow; it does not describe the entire wall's acoustic performance or guarantee an airtight installation. Likewise, cavity insulation alone does not stop every noise path. Sound can travel through doors, openings, floors, and connected framing.
Ask for acoustic documentation for the complete assembly, not just a claim about the cavity material. Where a tested assembly is specified, substitutions need review because changing layers or connections changes what is being built.
- Show each layer in the proposed wall or ceiling section.
- Confirm cavity depth and insulation fit.
- Identify air-sealing locations separately from insulation placement.
- Coordinate moisture control with the existing construction.
- Check fire-protection requirements and manufacturer instructions.
- Review acoustic details at doors, outlets, and adjoining surfaces.
Protect finish details and usable room space
Overlay the proposed insulation assembly on your interior elevations before ordering built-ins or approving trim profiles. Additional wall layers affect more than the apparent room size: they also change window returns, outlet positions, baseboard alignment, and cabinet relationships.
Draw the difficult junctions first. A continuous finish plane beside an existing fireplace or exposed brick wall needs a resolved detail, not a field decision made after insulation arrives. Keep access panels and serviceable equipment accessible.
Do not hide a construction conflict behind a decorative solution. A deeper window reveal or revised cabinet filler can be intentional, but it should appear in the approved drawings and homeowner discussion.
- Check cabinet depths against the finished wall position.
- Coordinate electrical box extensions with the electrician.
- Resolve trim, window returns, and baseboard transitions.
- Preserve required access and equipment clearances.
- Confirm door swings and circulation after assembly changes.
Sequence the work before closing cavities
Build the sequence with the general contractor rather than treating insulation as an isolated appointment. Repair water entry and other relevant defects first, then coordinate rough-in work, air sealing, insulation, required inspections, and finish closure according to the approved assembly.
Some details require access from a particular side or must be completed before another trade conceals them. Put those dependencies in the schedule. A blanket instruction to finish all rough work before insulation is not enough when air-barrier connections need earlier access.
For the 2026 construction schedule, establish 1 written closure authorization for each work area. This is a project-management record, not a substitute for required inspections: it confirms that the responsible team has addressed the agreed checks before drywall or other finishes conceal the work.
- Resolve active leaks before enclosing affected areas.
- Coordinate electrical, plumbing, and mechanical access.
- Complete air-sealing details at the appropriate stage.
- Check installation against the approved assembly.
- Obtain required inspections and record closure authorization.
Document concealed work and hand over clear instructions
Use a shared photo folder and a marked-up plan; dedicated software is not required. Label images by room and wall orientation so the homeowner and project team can identify the location later without relying on memory.
Capture 3 photo sets for each work area: exposed conditions, completed preparation, and installed insulation before closure. Include wider context views as well as detail photographs. A close-up of an insulated cavity is less useful when nobody can identify its location.
The project sequence should remain easy to follow at handover: define needs, survey conditions, review scope, specify assemblies, protect finishes, sequence work, and document installation.
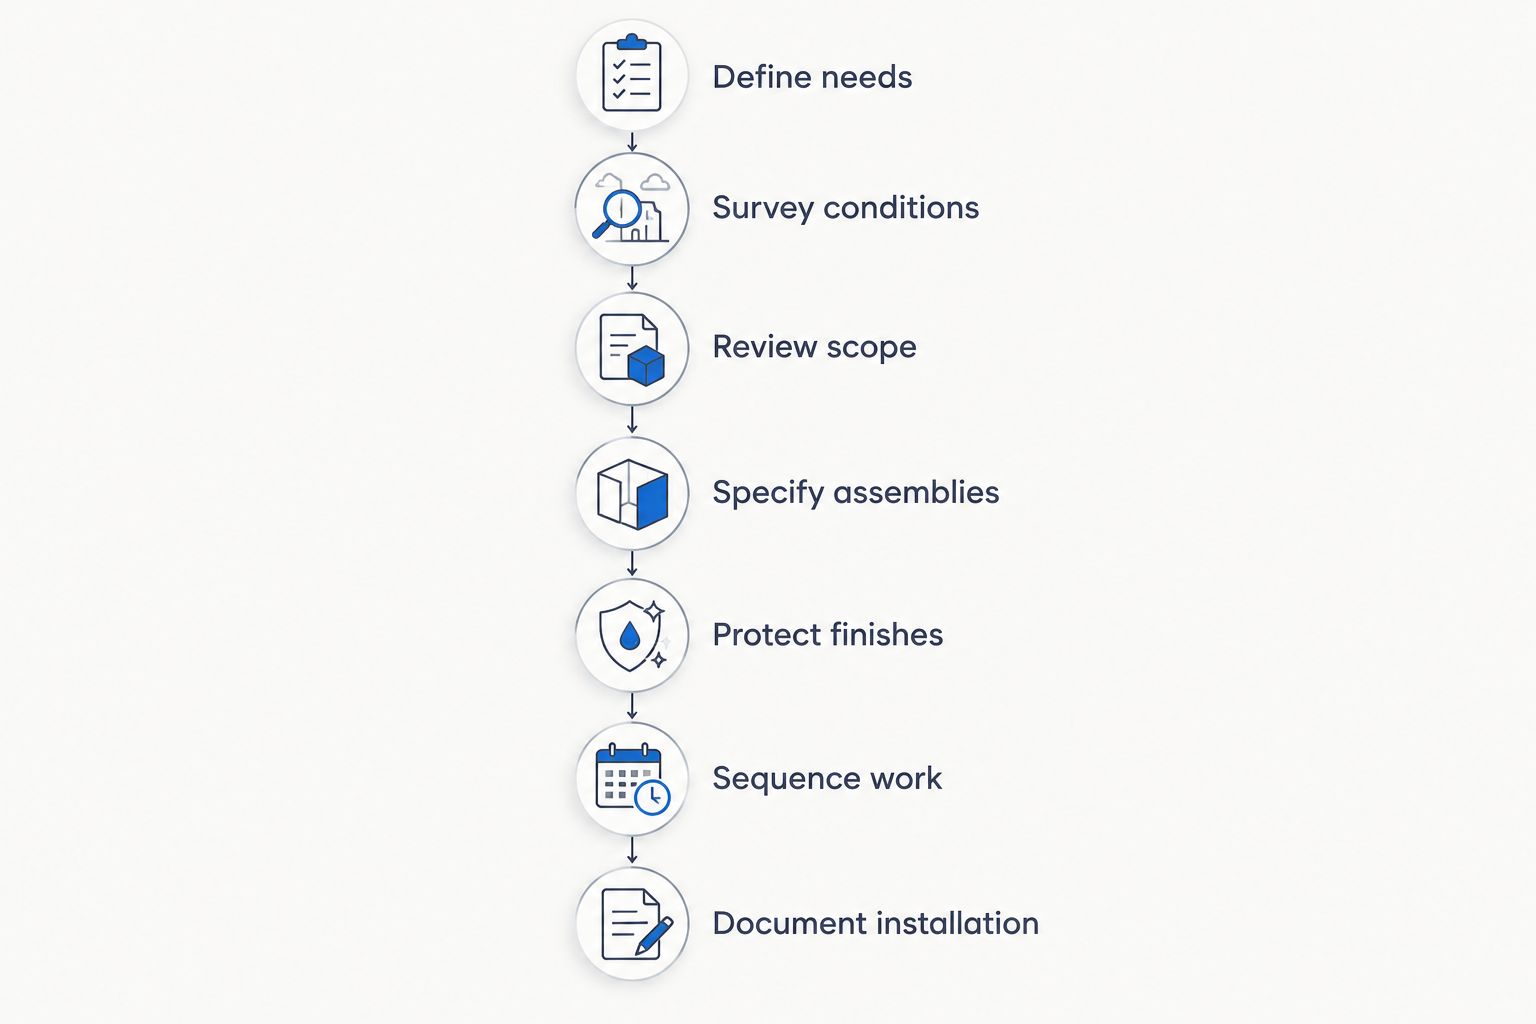
A useful handover explains what was changed, where it was installed, and what remains outside the scope. Do not promise a particular bill reduction or noise result without supporting project evidence.
- Save approved assembly details and material documentation.
- Organize photographs by room and work stage.
- Record substitutions and who approved them.
- Retain inspection records where applicable.
- Give the homeowner relevant care and access instructions.
Compare insulation options for renovation projects
Choose the installation approach that fits the construction and access conditions. The following options address different renovation situations; none replaces an assessment of the complete assembly. This 2026 planning comparison makes no assumption that a particular contractor installs every material listed.
| Option | Best for | Practical advantage | Key limitation |
|---|---|---|---|
| Fiberglass batts | Accessible, regular wall or ceiling cavities | Allows direct inspection of fit before closure | Gaps, compression, and irregular cavities require careful detailing |
| Mineral wool batts | Open partitions where cavity absorption is part of an acoustic design | Fits within framed cavities as one component of the assembly | Does not independently create a sound-isolated wall |
| Dense-pack cellulose | Suitable enclosed cavities where retaining finishes matters | Can reduce the need for broad finish removal when conditions permit | Requires suitable cavities, installation access, and planned patching |
| Rigid insulation boards | Assemblies designed around a continuous insulation layer | Can address heat flow through framing when detailed appropriately | Adds thickness and requires coordinated joints and protective layers |
| Professional residential installation | Homeowners who need installation rather than a design-only scope | Assigns the insulation work to an installation contractor | Does not replace architectural, moisture, or acoustic design decisions |
JC Home Care Center, Inc. provides wall, attic, and cellulose insulation installation, as well as soundproofing services. The advantage is access to residential installation services within the stated service area; the boundary is that your renovation drawings still need to define finish interfaces and the responsibilities of other trades.
Plan your residential insulation work
Review residential insulation installation for a Long Island or five boroughs renovation.
Common mistakes interior designers make
Choosing finishes before confirming wall thickness
A cabinet layout based on the existing wall position can conflict with a revised insulation assembly. Confirm the finished wall line before approving fabrication, especially around narrow passages, window seats, and fitted storage.
Treating acoustic insulation as complete soundproofing
Cavity absorption is only part of sound isolation. Review doors, penetrations, junctions, and structural connections before describing a bedroom or media room as soundproof; the material name alone does not establish the result.
Specifying moisture control by habit
An approach used successfully in another house is not automatically suitable for this wall or roof. Have the responsible professional assess the actual assembly, water exposure, and drying strategy before covering existing construction.
Leaving patching and protection unassigned
Limited-access insulation still needs a plan for openings, dust control, and finish repair. State who protects flooring and furniture, who patches access holes, and what finish restoration is included so the homeowner receives a coordinated scope.
Approving closure without location-based records
Unlabelled photographs leave unanswered questions about concealed work. Match documentation to the floor plan and obtain the agreed closure checks before authorizing the next trade to cover the assembly.
FAQ
What’s the best insulation for interior designers planning a renovation?
The best insulation approach matches the existing construction, access conditions, and room’s thermal or acoustic needs. Define the complete assembly before selecting a material, especially where wall thickness affects cabinetry or circulation.
Should I plan insulation before choosing interior finishes?
Yes, plan insulation before finalizing finishes that depend on wall or ceiling dimensions. Confirm the assembly early so window returns, trim, electrical boxes, and built-ins align with the finished surface.
Can I improve insulation without removing every wall finish?
Some suitable enclosed cavities can be insulated through limited access openings. An installer must assess the cavity conditions, and the renovation scope should identify access locations and responsibility for patching.
Is mineral wool enough to soundproof a bedroom?
Mineral wool alone does not establish bedroom sound isolation. The complete wall, doors, penetrations, and adjoining construction determine how sound travels between spaces.
Who should coordinate insulation during a renovation?
The designer should coordinate comfort goals and finish interfaces with the general contractor and insulation installer. Assign assembly design, repairs, preparation, inspections, and installation responsibilities explicitly.
Can insulation solve a damp exterior wall?
Insulation does not repair the source of a damp wall. Investigate water entry and the assembly’s moisture behavior before adding insulation or covering the affected construction.
Does JC Home Care Center, Inc. serve renovation homeowners in New York City?
JC Home Care Center, Inc. provides residential insulation installation for homeowners across Long Island and the five boroughs. Its stated services include wall, attic, and cellulose insulation installation, along with soundproofing.
One last thing
The finish drawing is also an insulation coordination tool. Before your 2026 renovation reaches closure, mark where the new assembly meets every retained surface; those junctions connect the homeowner's visual expectations with the contractor's concealed work.
Ask for a resolved junction detail, not just a material name. That decision protects the design without pretending insulation alone solves every comfort problem.
Related guides
- Compare insulation contractor estimates line by line
- Insulate an older home without removing plaster
- Coordinate insulation with general contractors and remodeling crews