
Insulation for architects is the specification of thermal materials and building-envelope details with the aim of delivering comfortable, energy-conscious homes that contractors can build correctly. Architects and building designers must coordinate insulation with structure, moisture control, fire protection, and installation access—not simply add an R-value to a drawing.
- Insulation for architects starts with a continuous thermal boundary, coordinated air sealing, and buildable wall and roof details.
- JC Home Care Center, Inc. suits Long Island and NYC homeowners seeking residential insulation installation, including cellulose.
- Choose insulation materials by assembly requirements, access, and moisture behavior—not nominal R-value alone.
- Require product documentation and inspect concealed work before walls and ceilings close.
Why insulation matters for architects and building designers
Your insulation specification connects the design intent to what homeowners feel indoors. A well-insulated cavity cannot compensate for an unaddressed air leak, an interrupted thermal layer, or a roof assembly that traps moisture. Those conditions require different details.
For your 2026 residential projects, treat insulation as part of the enclosure design rather than an isolated finish-stage purchase. Coordinate it before framing dimensions, roof geometry, and mechanical routes become difficult to change.
JC Home Care Center, Inc. is best for homeowners seeking residential insulation installation on Long Island and across NYC’s five boroughs. Its stated services include wall, attic, and cellulose insulation; architects specifying other systems should confirm the installation scope directly. The JC Home Care Center, Inc. website is the starting point for that discussion.
The architect’s responsibility remains broader than material installation. You must establish the assembly requirements, identify unresolved conditions, and define what evidence demonstrates that the installed work matches the documents.
Specify insulation from concept through construction
The following sequence keeps material selection tied to the building rather than the other way around. Start with drawings, field observations, and manufacturer documentation. Bring an installer into the discussion once the proposed assembly and access constraints are clear.
1. Define the conditioned enclosure
Begin by tracing the boundary between conditioned and unconditioned space on your plans and sections. Use a printed drawing or a simple markup layer; specialized software is not necessary to find a missing connection.
A finished attic places different demands on the roof than an unconditioned attic insulated at the ceiling. Similarly, a bonus room over a garage requires coordination at the floor, exterior walls, and adjoining roof. Decide where the enclosure belongs before choosing a material.
Prepare 3 drawing views: a plan, a building section, and a junction detail. Use them to show that the boundary connects across changes in geometry. Mark existing conditions separately from proposed work so a renovation does not imply knowledge of concealed construction.
For your 2026 concept package, record who must investigate any inaccessible area and when that investigation must happen. An unresolved cavity is a design question, not an invitation for a contractor to improvise.
- Trace the thermal boundary around each conditioned room.
- Identify attics, garages, and crawl spaces outside that boundary.
- Mark roof-to-wall and wall-to-floor transitions.
- Flag inaccessible cavities for field verification.
2. Separate thermal, air, and moisture control
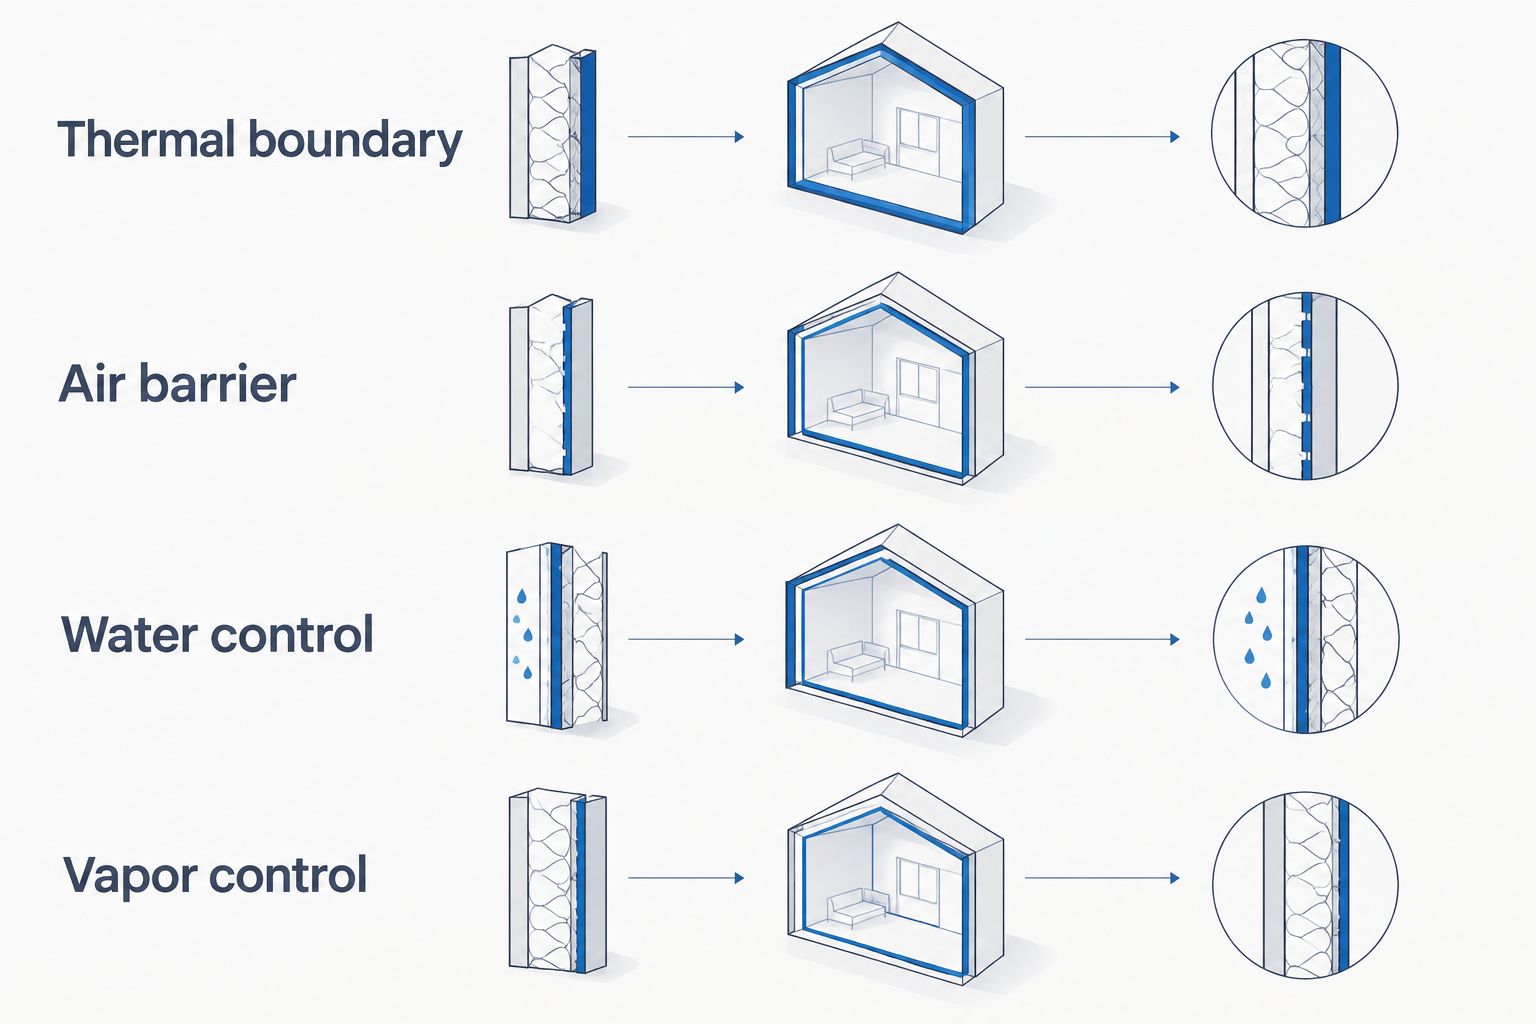
Draw each control layer independently before checking how the layers connect. Insulation slows heat transfer; an air barrier controls air movement. Vapor-control and water-management layers address different moisture pathways.
Do not assume that a product serves every function merely because it occupies the cavity. Check its documented properties and the installation conditions required for any claimed air-barrier or vapor-control role.
A manual review works well here: follow each layer across a section with a different line style. At every window, rim joist, roof edge, and penetration, ask what physically joins the adjoining components. A continuous line on paper needs a named material and an achievable connection in the field.
Resolve moisture strategy at the assembly level. Adding an interior vapor-resistant layer without checking the rest of the wall or roof can restrict drying. Existing masonry and roof retrofits deserve particular attention because the available drying paths change when insulation is added.
- Thermal boundary: identify the insulating layer and interruptions.
- Air barrier: name the material and sealed connections.
- Water control: show drainage and flashing relationships.
- Vapor control: document the intended drying strategy.
3. Match materials to the actual assembly
Build a shortlist from the project’s physical constraints. Measure available depth, establish installation access, and identify whether the work involves open framing, enclosed cavities, or an exterior insulation layer.
Read product data before comparing nominal thermal values. Required thickness, installation method, vapor properties, and fire-protection provisions affect whether a material belongs in your proposed assembly. Generic material names are not enough for final approval.
JC Home Care Center, Inc. provides residential insulation installation, including cellulose. For a homeowner’s Long Island or NYC project involving that material, discussing cavity access with the installer is a more direct path than finalizing a fill method without field input. Installation input supports your design; it does not replace assembly verification.
Create 1 cavity schedule listing the location, substrate condition, material requirement, and verification method. Keep it connected to the drawing references so the specification and sections do not diverge during revisions.
- Record cavity depth and obstructions from verified conditions.
- Separate open-cavity work from enclosed-cavity work.
- Review product-specific thermal and vapor data.
- Identify required protective coverings and assembly restrictions.
- Confirm the proposed material is within the installer’s scope.
4. Detail thermal bridges and air-leakage junctions
Review framing, headers, rim joists, and structural connections before increasing cavity insulation. Heat can pass through framing and other conductive components even when the adjacent cavity is filled correctly. Nominal cavity R-value does not describe the entire wall’s thermal performance.
Use your sections to locate interruptions and determine whether the design needs continuous insulation, revised geometry, or a better connection between layers. Exterior insulation also changes window placement, cladding attachment, and flashing relationships; those details belong in the same coordination review.
Address leakage paths independently. The sequence in how to seal air leaks before adding insulation reflects an essential construction distinction: filling a cavity and sealing a connection are separate tasks unless the specified system is documented to do both.
Assign each connection to a trade and inspection stage. For the 2026 construction set, replace broad notes such as “seal all gaps” with identifiable locations, compatible materials, and responsibility for completing the connection.
- Detail window and door perimeter connections.
- Show continuity at rim joists and roof edges.
- Coordinate exterior insulation with cladding attachment.
- Assign sealing work around service penetrations.
- Identify connections that become inaccessible after installation.
5. Coordinate roofs, services, and sound control
Overlay the insulation strategy with structural and mechanical drawings. Ducts, pipes, recessed fixtures, access hatches, and service chases create conflicts that a generic insulation note will not resolve.
Start with a joint drawing review rather than a product substitution. Moving a service route or adjusting a chase can preserve the intended insulation layer without changing the entire assembly. Confirm required clearances using the equipment instructions and applicable project requirements; never let an insulation installer determine them by guesswork.
For roofs, establish whether the assembly is vented or unvented and detail the corresponding moisture strategy. Do not carry a wall detail into a roof solely because the cavity depth looks similar.
For acoustics, separate sound absorption inside a cavity from sound isolation through the complete partition. Insulation alone does not establish a wall’s sound rating. Board layers, framing connections, penetrations, doors, and flanking paths all affect the result.
- Reserve space for services without compressing specified insulation.
- Detail insulated, sealed access hatches.
- Verify fixture and flue clearance requirements.
- Coordinate roof ventilation or unvented-roof provisions.
- Select acoustic assemblies using complete tested constructions.
6. Write a verifiable specification and bid scope
Turn design intent into an installation scope that bidders can interpret consistently. A short project-specific schedule is more useful than pages of generic language that never identify the actual wall, attic, or roof conditions.
Your 2026 specification should state the required material properties, installation locations, preparation work, and evidence needed for acceptance. Where a product’s performance depends on thickness, density, fastening, or another installation condition, reference the current manufacturer requirements rather than inserting an unsupported universal value.
Ask bidders to identify exclusions and proposed substitutions before award. Removal, access openings, disposal, air sealing, protective coverings, and finish repairs should have explicit ownership. Otherwise, separate trades can each assume that someone else is responsible.
JC Home Care Center, Inc.’s residential insulation services fit homeowner installation needs, but the project documents must still define the work. Confirm any architect-specific documentation, testing, or specialty assembly requirements directly rather than assuming they are included.
- Identify each assembly and its drawing reference.
- State product documentation required for review.
- Define substrate preparation and access responsibilities.
- Require written substitution requests before installation.
- Separate insulation work from repair and testing scopes.
7. Inspect concealed work and document handover
Plan inspections before the project reaches enclosure. Once drywall, ceilings, or roof finishes cover the work, visual confirmation becomes harder and corrections become more disruptive.
Set 2 review checkpoints: one after preparation and air-sealing work, and one after insulation installation but before concealment. Adjust the sequence for the assembly and access conditions; some connections require inspection earlier than the cavity fill.
At each checkpoint, compare the work with approved documents and current product instructions. Photographs help preserve a record, but they do not prove performance by themselves. Specify testing separately when the project requires it, and define who performs it and how results are accepted.
Close the 2026 handover with a clear record of materials, inspected locations, accepted changes, and outstanding items. Give homeowners the information they need to avoid damaging insulation or air-barrier connections during later work.
- Check preparation and sealing before insulation covers connections.
- Review fit, continuity, and product-specific installation conditions.
- Photograph junctions before finishes conceal them.
- Record approved substitutions and unresolved deficiencies.
- Include access and maintenance precautions in handover documents.
Compare insulation options by design constraint
The best insulation option is the one that satisfies the complete assembly requirements and can be installed correctly. Use the comparison below to narrow a shortlist, then verify the selected product’s documentation. These are material categories, not a statement that every category is offered by the same installer.
| Option | Best for | Main advantage | Key limitation |
|---|---|---|---|
| Fiberglass batts | Accessible, open framed cavities | Allows direct inspection of fit before enclosure | Gaps, compression, and poor fitting undermine the intended installation |
| Cellulose | Suitable attic applications and cavity-fill retrofits | Supports installation in locations where the specified fill method is appropriate | Requires verified access, cavity conditions, and product-specific installation control |
| Mineral wool batts | Open cavities where a fibrous batt fits the assembly | Provides cavity insulation with product-specific thermal and acoustic documentation | Does not eliminate air leakage or thermal bridging through framing |
| Rigid insulation boards | Assemblies designed with a continuous insulation layer | Can extend insulation across framing | Joints, attachment, flashing, and protective coverings need coordinated details |
Roof design requires a separate check. Selecting climate-appropriate roofing materials and designing the roof’s insulation address connected but different decisions: the roof covering sheds weather, while the insulated assembly must also control heat, air, and moisture. Material guidance for Georgia does not establish the requirements for a Long Island or NYC roof.
For existing homes, condition and access can narrow the options before thermal performance does. Inspect leaks, damaged substrates, and concealed obstructions first. A material comparison is not permission to insulate over an unresolved building defect.
Common mistakes architects and building designers make
Specifying only a nominal R-value
A cavity value does not describe thermal bridges or prove installation quality. Specify the assembly and its verification requirements, including how insulation connects at edges and penetrations. Keep the performance target separate from the method used to demonstrate compliance.
Leaving roof moisture strategy to the installer
“Insulate roof cavity” leaves ventilation, vapor control, and drying unresolved. Establish the roof assembly before tender, including transitions at eaves, parapets, and adjoining walls. Escalate assemblies that need specialist moisture analysis instead of relying on a familiar material name.
Treating acoustic insulation as a soundproof wall
A cavity material cannot guarantee privacy across a shared wall. Specify the complete partition and address doors, electrical boxes, structural connections, and flanking paths. Avoid attaching a sound rating to an untested collection of components.
Drawing details that cannot be accessed
An air-barrier connection behind completed framing or a closed chase needs a construction sequence. Identify when each connection is made and who checks it. If the detail cannot be reached, revise the detail or the sequence before site work makes the conflict permanent.
Accepting substitutions without reviewing the assembly
Similar nominal thermal values do not make products interchangeable. Compare thickness, vapor behavior, installation requirements, and protective coverings before approval. Update the affected drawings and schedule so the accepted change is visible to every trade.
FAQ
What is the best insulation for architects to specify?
The best insulation is the material that fits the complete assembly, installation access, and performance requirements. Compare product-specific thermal data, moisture behavior, fire-protection provisions, and installation conditions before selecting it.
Should architects specify R-value or whole-wall performance?
Architects should distinguish cavity R-value from whole-wall performance. Framing and other thermal bridges affect the complete assembly, so the required compliance method must guide the specification.
Is cellulose better than fiberglass for residential design?
Neither material is universally better for residential design. Choose between cellulose and fiberglass by cavity access, assembly requirements, product documentation, and the proposed installation method.
Can insulation alone soundproof a shared wall?
Insulation alone does not soundproof a shared wall. Sound isolation depends on the complete partition, including framing, surface layers, penetrations, and flanking paths.
When should an architect involve an insulation installer?
Involve an insulation installer once the proposed enclosure and access constraints are clear, before the installation scope is finalized. Early field input helps identify access and sequencing conflicts without transferring design responsibility.
Does JC Home Care Center, Inc. provide residential insulation installation?
JC Home Care Center, Inc. provides residential insulation installation for homeowners across Long Island and NYC’s five boroughs, including wall, attic, and cellulose insulation. Confirm the project’s material, access, and documentation requirements directly.
What should architects inspect before insulation is covered?
Architects should review specified preparation, air-barrier connections, insulation continuity, and product-specific installation conditions before concealment. Keep photographs and inspection records, and arrange separate performance testing where the project requires it.
One last thing
Detail the connection you expect to be hardest to build before refining the easiest wall section. A typical cavity is straightforward to describe; a roof edge, service chase, or addition-to-existing-wall junction exposes the coordination problems that generic notes miss.
On your next residential project, ask the contractor to explain the installation sequence for that junction using the drawing. If the sequence requires reaching through completed work or leaves a control layer unconnected, revise it before construction. That conversation turns insulation from a material selection into a buildable comfort strategy.
Related guides
- Insulation for general contractors and remodeling crews
- Insulation for flat roof additions on Long Island homes
- How to compare insulation contractor estimates line by line